Join us on the Miyajima Travel Guide as we explore the historical Itsukushima Shrine, climb Mount Misen, enjoy onsen hot spring, and check out the largest rice scooper in the world.
Our family took a trip to southern Japan last year and had an amazing time. Even though it’s still Japan, the food, the scenery, and the culture are very different from large cities like Tokyo, Kyoto, or Osaka.
We’ll share a travel guide for each location we visited once a week. If you missed our first post for the Hiroshima/Kyushu trip, here are the links to visit the Hiroshima Peace Memorial Museum and Hiroshima Castle. For each location below that we visited, we’ll also share a local recipe the same week.
- Hiroshima (広島) – recipe Grilled Oysters
- Miyajima/Itsukushima (宮島/厳島)
- Beppu (別府)
- Yufuin (由布院/湯布院)
- Kurokawa (黒川)
- Kumamoto (熊本市)
- Fukuoka (福岡市)
Ready to tour Miyajima with us? Let’s go!
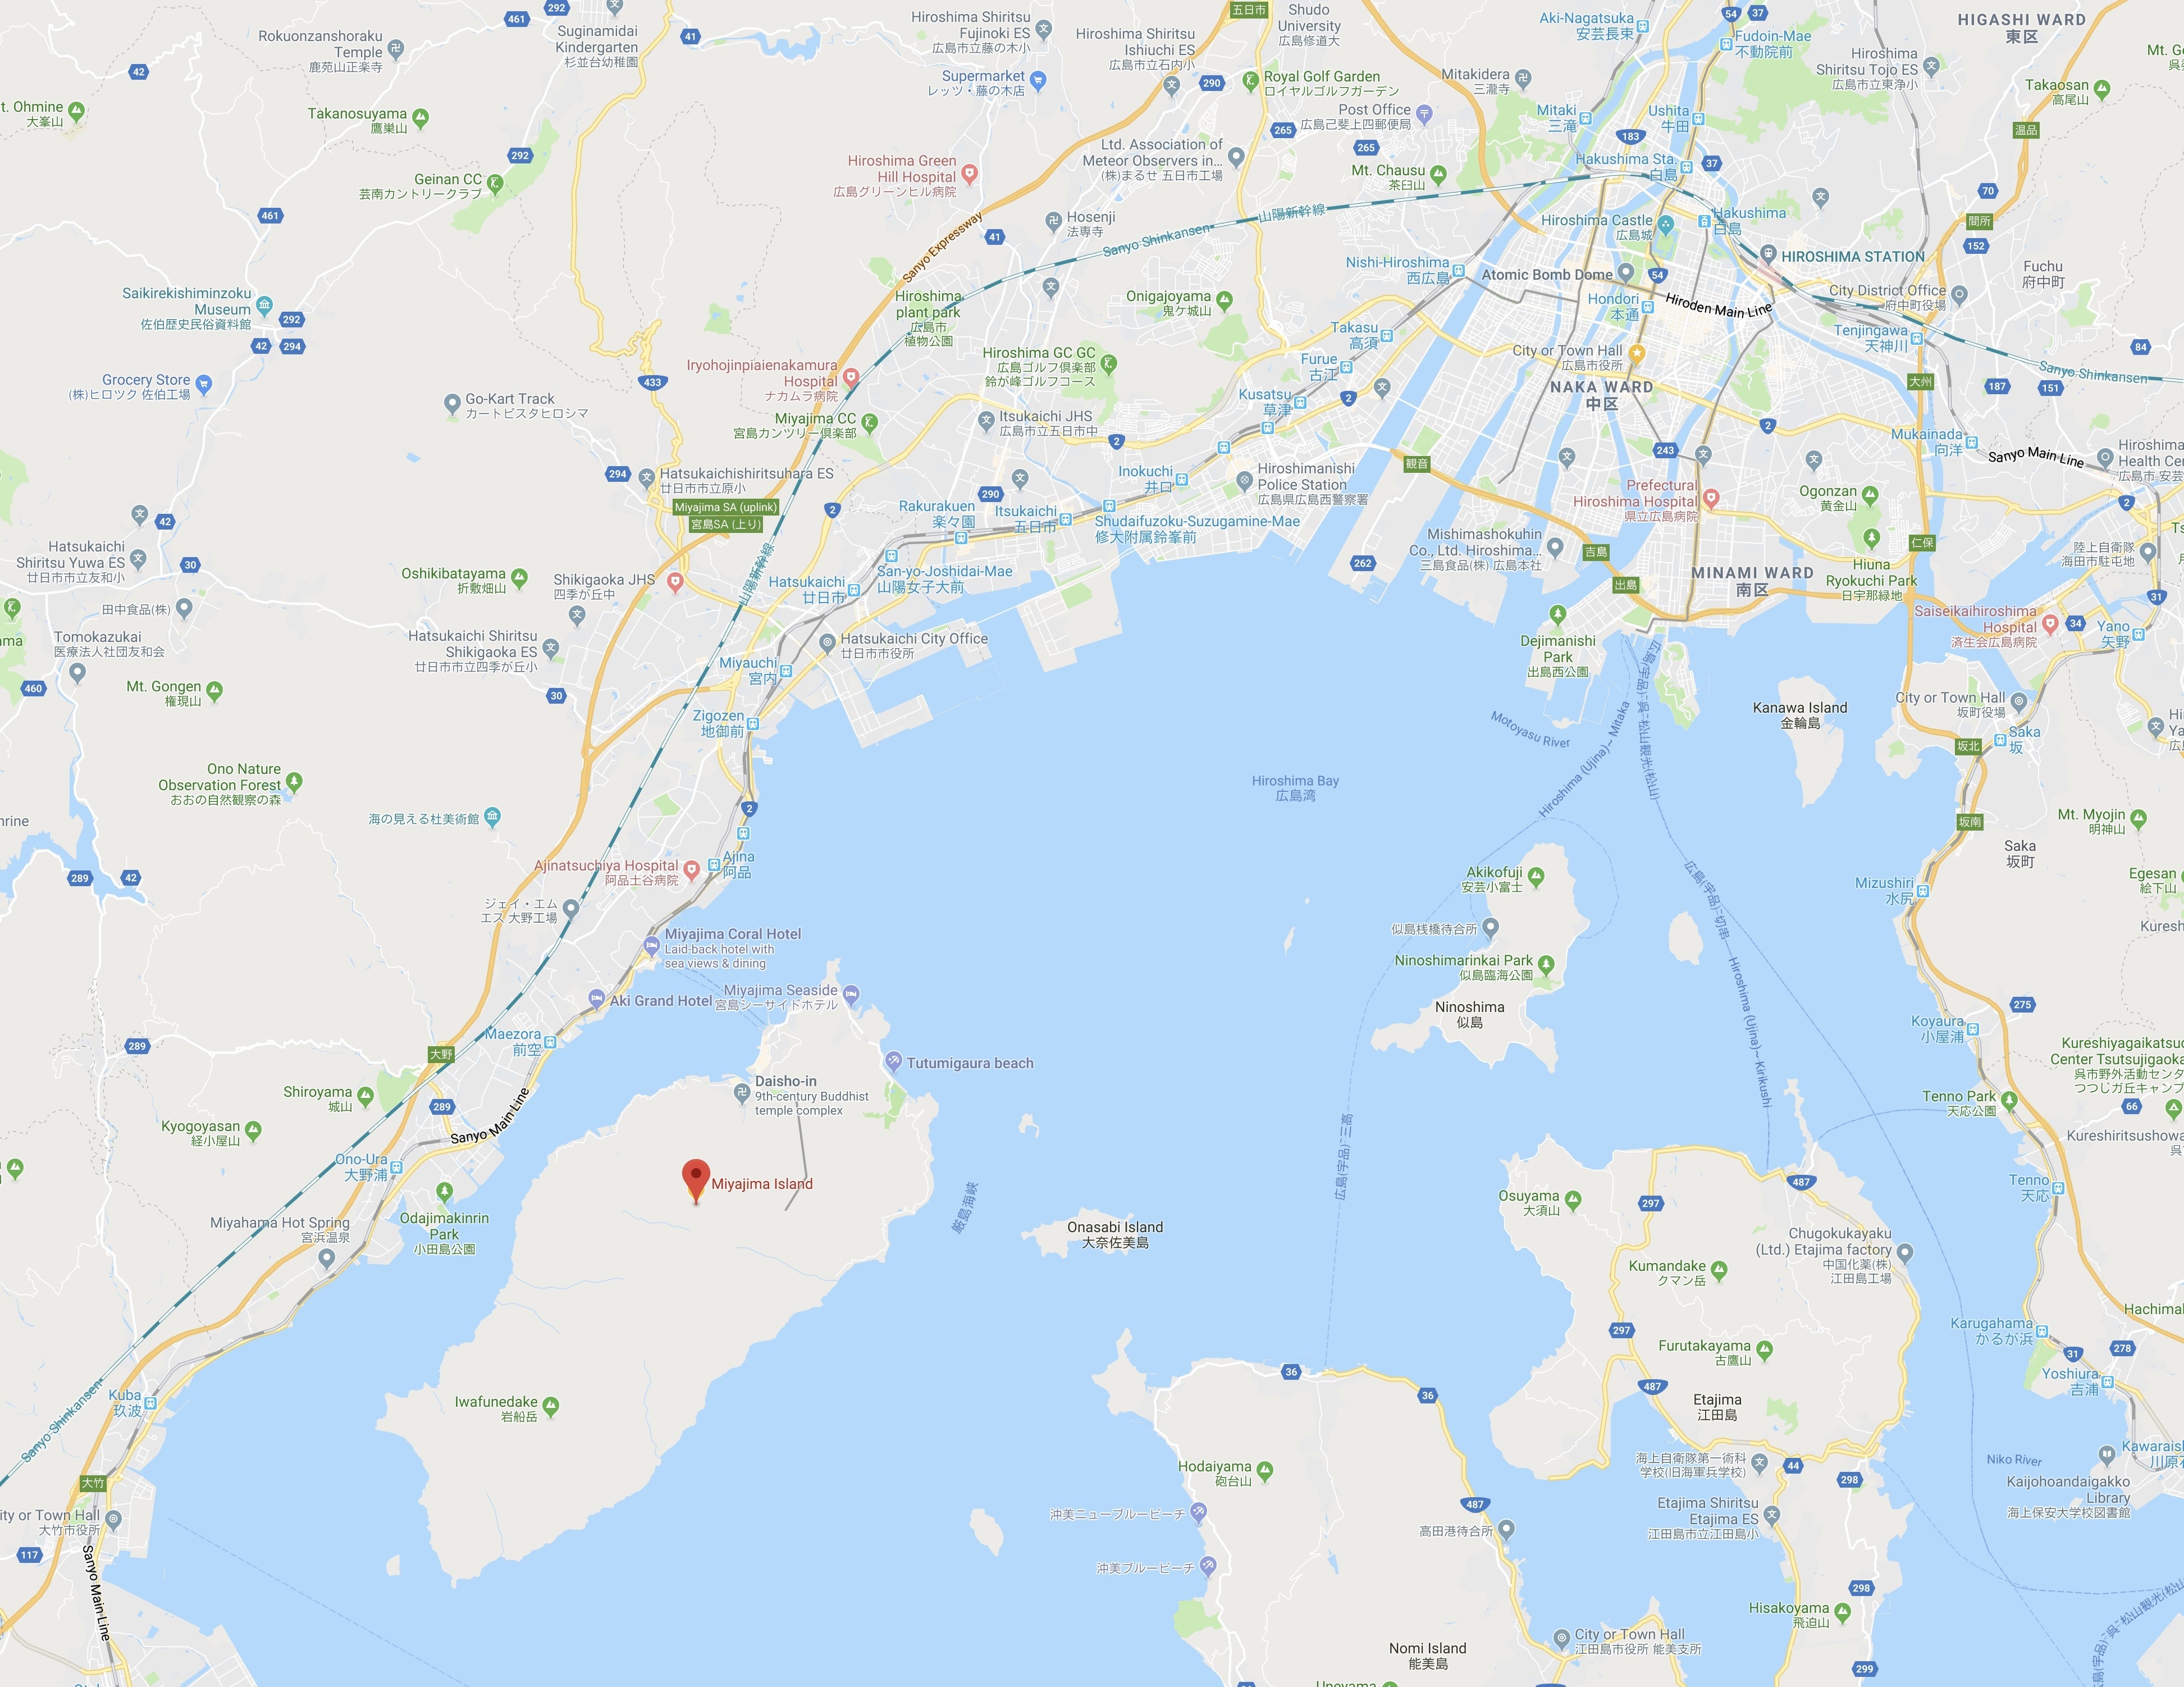
Click to enlarge map.

From Hiroshima JR Station, you will take the JR San-yo Line to get to Miyajima. It’s about a 30-minute train ride to Miyajimaguchi Station. If you have a Japan Rail Pass you can ride the train for free. We have an interesting story to share about our experience on this short train ride. Trust us, it’s an interesting saga. More on that later.
Getting to Miyajima (Itsukushima)
When you get to Miyajimaguchi Station, just follow the exit sign for JR Miyajima Ferry. The ferry is also free if you have a JR Pass. The walk from Miyajimaguchi Station to the ferry terminal is only 5 minutes.


You pass a few shops on the way to the ferry terminal. One of the local treats you’ll see quite often is the popular momiji manju (もみじ饅頭). Here is the machine that makes the treat.

After a quick walk, we arrived at the ferry terminal! Our family was really excited to ride the ferry. We had visited Hiroshima Castle and Hiroshima Peace Memorial Museum earlier that day so our legs were a bit tired. The only thing on our minds was an amazing meal and nice relaxing hot spring after a short boat ride away.

The ferry runs every 15 min during the peak hours, for detailed schedule please visit JR’s website. The ferry ride is 10 min to cross the Onoseto Strait.

Just One Cookbook Miyajima Saga (Sidebar)
An interesting event happened while we were crossing the strait, you can skip ahead for the rest of the Miyajima Travel Guide or grab a coffee and spend a bit of time with us for the story.
The ferry wasn’t too crowded when we got on and we were able to find great seats and viewpoints to take pictures. I (Mr. JOC) was so excited to finally see the torii gate in person and I was happily snapping away pictures.
About 5 minutes into the ride, I was ready to sit down and Nami seemed busy talking to an American family. It turned out the mom recognized Nami and they were talking about the recipe she had tried from Just One Cookbook! Back to the story…

I headed towards our seating area and noticed my backpack was missing. With an uneasy feeling, I interrupted Nami’s conversation and asked her where is my backpack. Nami said she hasn’t seen. Immediately I started searching the entire boat. There were 3 levels and since there weren’t many riders, it was easy to see if my backpack was lying around somewhere.

Unfortunately, after running around frantically for a few minutes, I was 100% sure the backpack was not on the ferry. The backpack contained my wallet, all our passports, my iPhone, and everything else important to me except for the camera (which I had around my neck).
Losing my mind a bit and not sure what to do, our 9-year old daughter suggested that we should use the Find iPhone app and figure out where it was. When we pulled it up on Nami’s iPhone, we could see the backpack moving on the train track on San-yo line. OMG! I had left my backpack on the train. Nami spoke to the ferry operators and there’s nothing they could do. We needed to head back to Miyajimaguchi Station.
From this moment on, every minute felt like an eternity. The ferry finally docked in Miyajima and we patiently waited until it departed for Miyajimaguchi. 10 minutes later, we ran off the ferry and headed towards Miyajimaguchi Station. We found the JR station personnel and explained what happened.

As we continue to track my iPhone, the train had stopped at Iwakuni Station and actually started heading back towards Hiroshima. When we were talking to the station personnel, my iPhone and backpack were just 2 stations away (had passed us). For whatever reason, I thought the JR staff would ask other station personnel and grab my backpack from the train. The answer was no, the train will go all the way to Hiroshima and we can grab the backpack there.
What’s the chance my backpack travels more than an hour by itself and not get taken? The JR staff asked us to head towards Hiroshima Station but that didn’t make any sense to us. If my backpack gets taken what would be the point? We explained our logic to the personnel, and they said in a matter of fact tone “that doesn’t happen”.
Fast forward 20 minutes, they received a call from Hiroshima station and confirmed my backpack has been found and the JR staff is keeping it for us. We simply couldn’t believe it. Our family jumped on the JR train and headed to Hiroshima to grab my backup. We retrieved my backpack, rode the train again, hiked to the ferry terminal, and this time we got to enjoy the beautiful ferry ride on the Hiroshima Bay during sunset.
Thank you to the Miyajimaguchi JR station team that helped us! It saved our trip, we couldn’t imagine losing all our important documents and cash on the second day of traveling.
Travel tip: In Japan, credit cards are widely accepted but many local shops still accept cash only. Most train ticketing machines also accept cash only as well. Always keep some cash on you when traveling in Japan.

Our son wanted a picture of him on the bay and our daughter obliged, but she was taking a selfie instead!


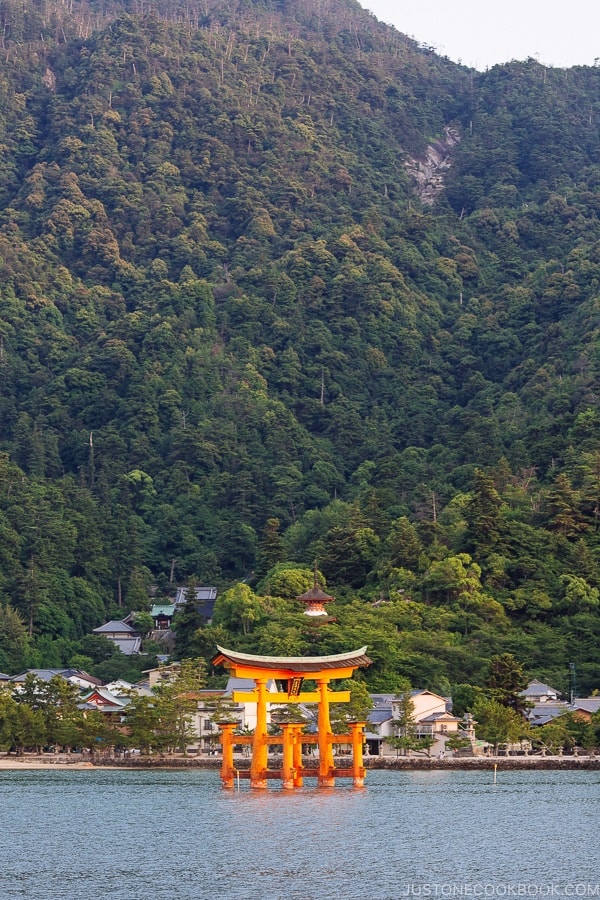
Torii gate at 3 pm.
As the boat got closer to Miyajima, the torii gate gets larger and larger. When we rode the ferry the first time at 3 pm, it was low tide and visitors can walk to the bottom of the torii gate. By the time we took the ferry the second time, it was already 5 pm and the tide had risen to cover the bottom of the torii gate.

Torii gate at 5 pm.
Miyajima or Itsukushima?
Though better known as Miyajima (宮島) – Shrine Island, the official name is actually Itsukushima (厳島). However, even travel sites within Japan refer to the island as Miyajima.
Since we arrived at Miyajima much later than originally planned, we didn’t have time to sightsee and headed straight to our hotel – Miyajima Grand Hotel Arimoto. The hotel has a shuttle that picks up their guest from the pier. Guests can call ahead and arrange the pickup time. From the pier to the hotel is a just a short 15-minute shuttle ride.
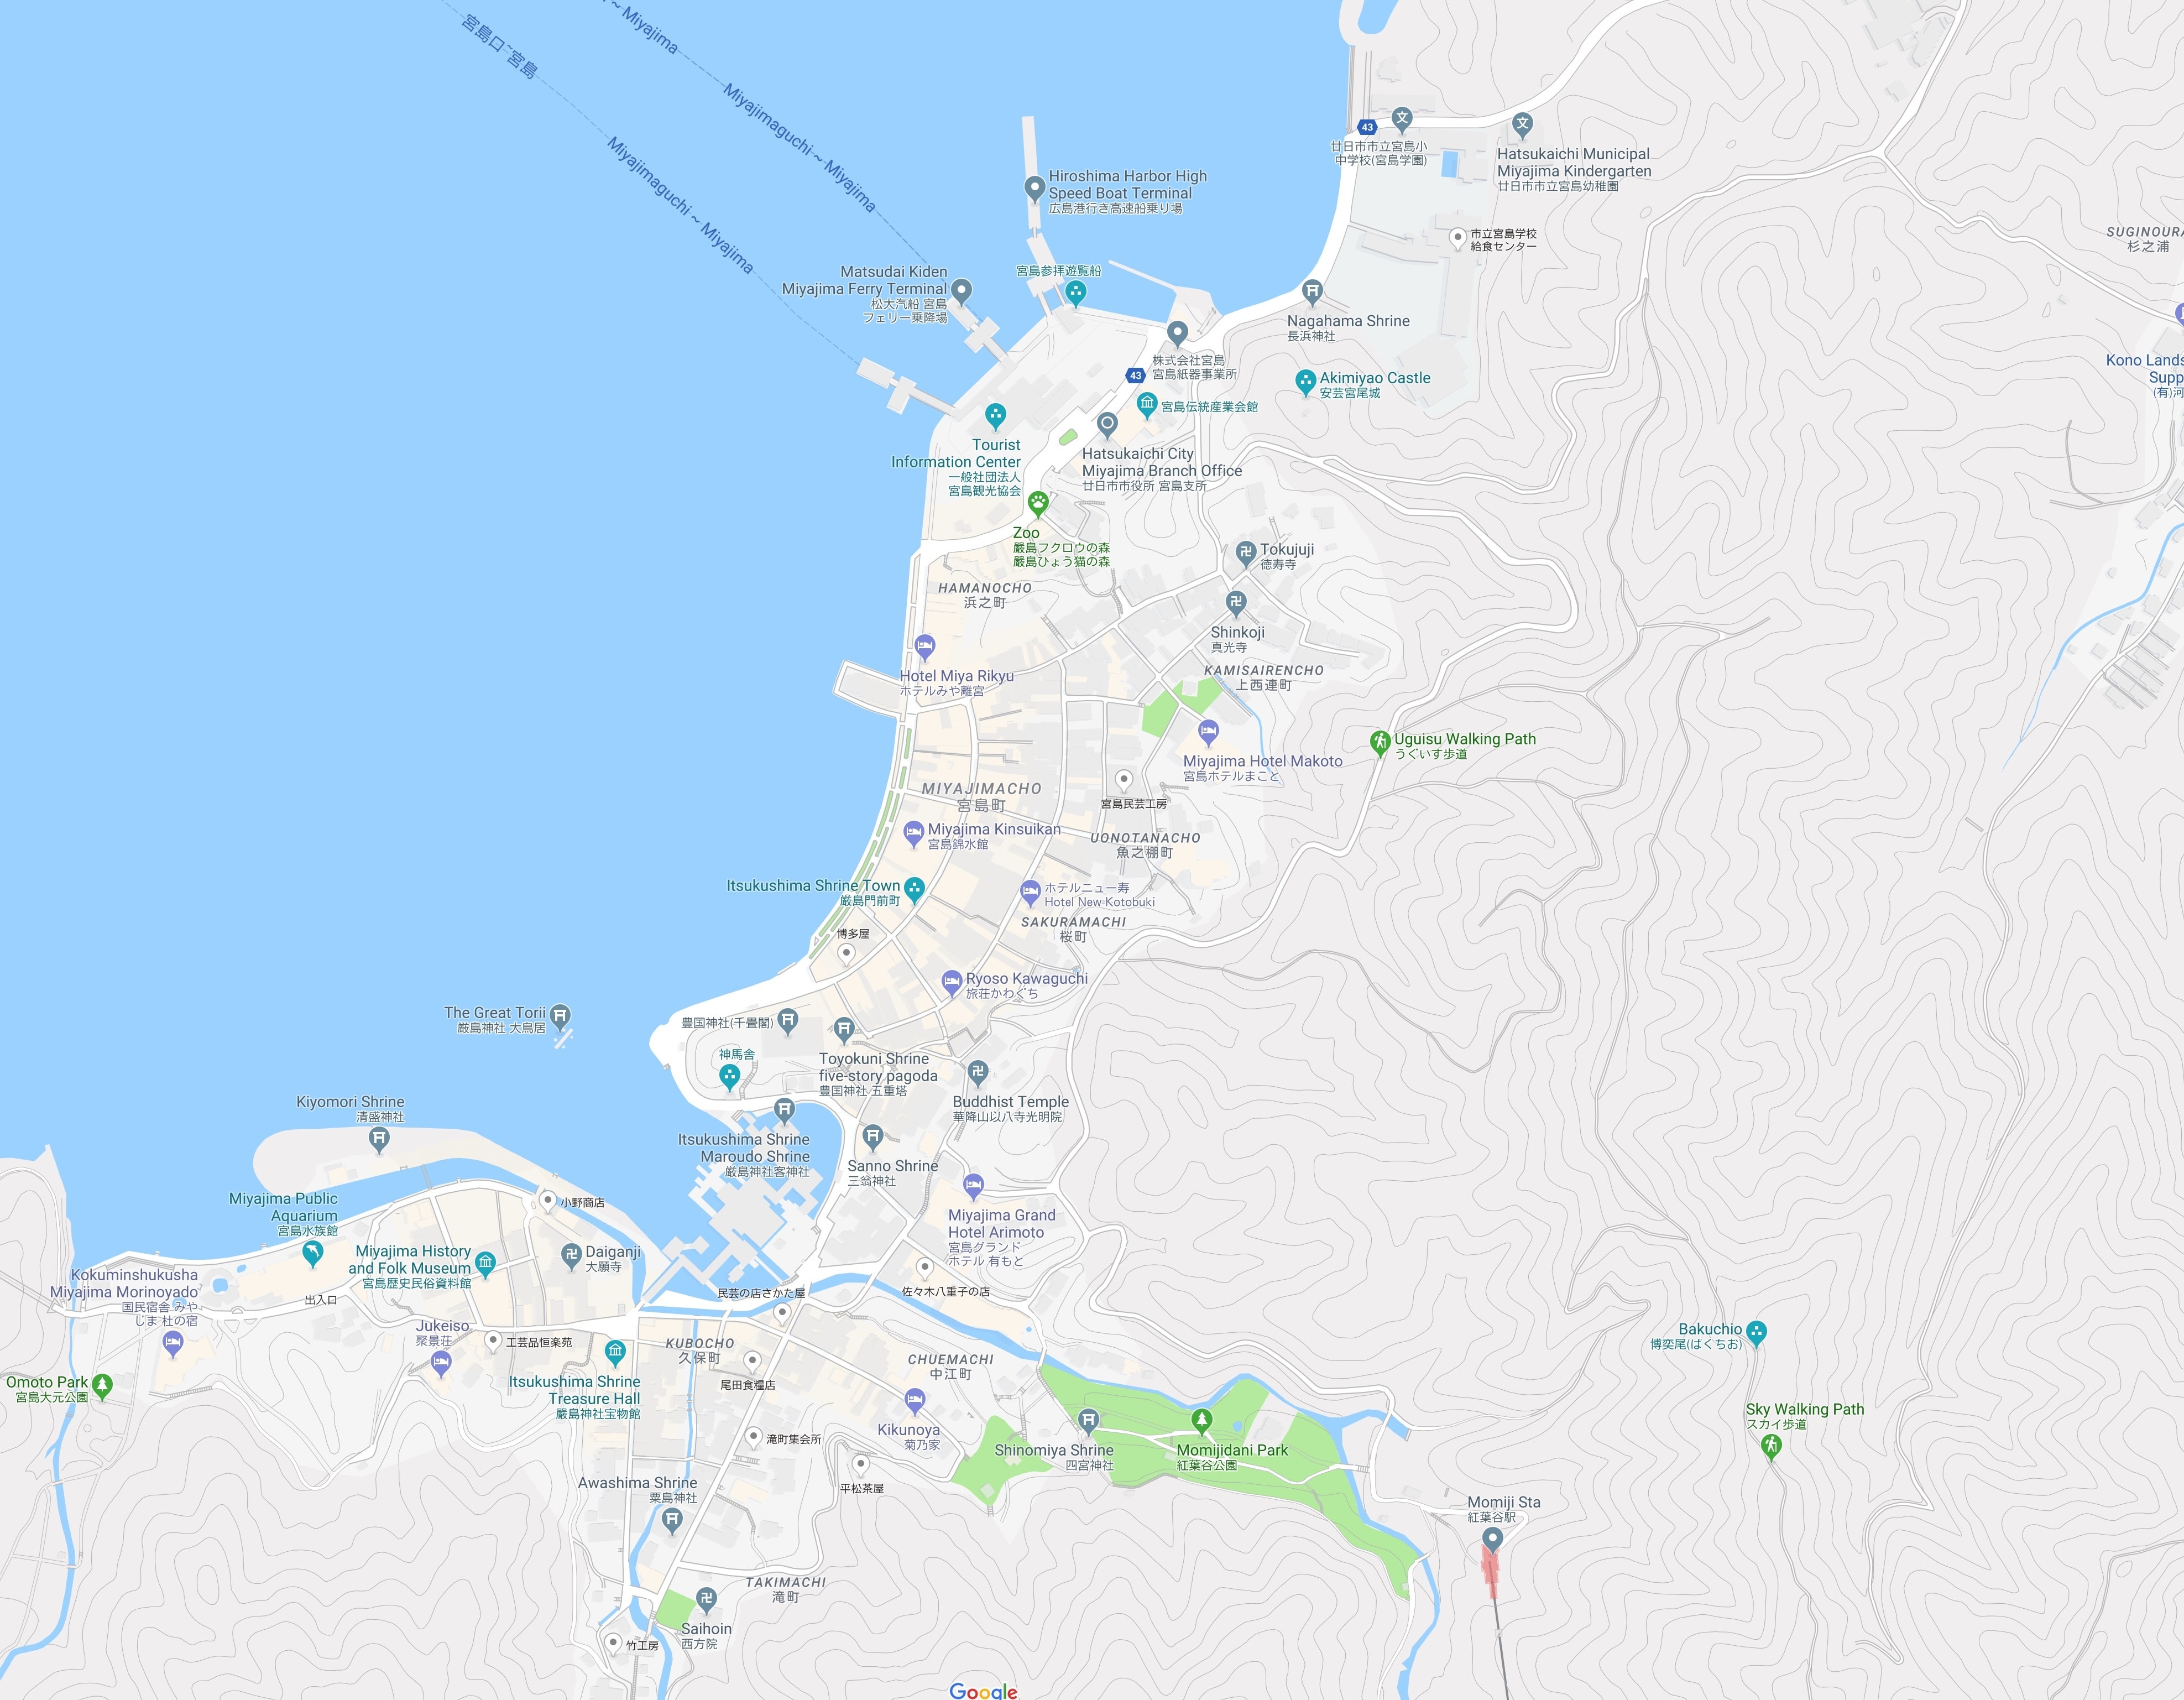
Click to enlarge map.
Miyajima Grand Hotel Arimoto | Miyajima Travel Guide
We selected Miyajima Grand Hotel Arimoto based on visitor reviews and pricing on JTB. We typically select a hotel that is mid-tier with good food score and decent onsen. The hotel is centrally located, about a 55-minute walk to the Itsukushima Shrine and downtown Miyajima. In case you were wondering which JTB plan we booked, it was the book 60 days prior to travel plan including Kaiseiki dinner (瀬戸内懐石料理) and breakfast. The price per adult was 16,200 yen.


Our room was slightly more spacious than the typical ryokan room, with an extra sitting room. This is what it looked like with the sitting table and the futons made up for the night.


Shortly after arriving (around 6:30 om), the hotel hostess situated us and asked us to head down to the dining room quickly as we were late due to my incident. The dinner was kaiseki course meal featuring ingredients from Seto Inland Sea (瀬戸内海). I won’t go into too much detail as the dishes will likely be different if you decide to visit (ryokan meals change depending on the season and what fresh ingredients are available).


Dinner started with a fruit wine and appetizers.

Sashimi platter – the seafood was amazingly fresh and one of the highlights.


Sea bream hot pot.

Besides oysters, sea eel/anago is another prominent local ingredient that’s featured prominently in the region.

When in Hiroshima, grilled oysters are a must have.

Hiroshima beef takaki.

Sea bream cooked in rice.

After dinner, we went out for a stroll, but downtown shops are closed pretty early and there’s not much of a nightlife. The next morning, we got up early to get ready for a fun-filled day to Itsukushima Shrine and Mount Misen. Power up with Japanese breakfast before heading out.

On Miyajima, there are deer roaming around freely. You can see them walking all over town.


Itsukushima Shrine & Mount Misen | Miyajima Travel Guide
For this Miyajima Japan Guide, we visited 2 locations, Itsukushima Shrine and Mount Misen. Please click on the images below to learn more about each location.


Miyajima Main Street | Miyajima Travel Guide
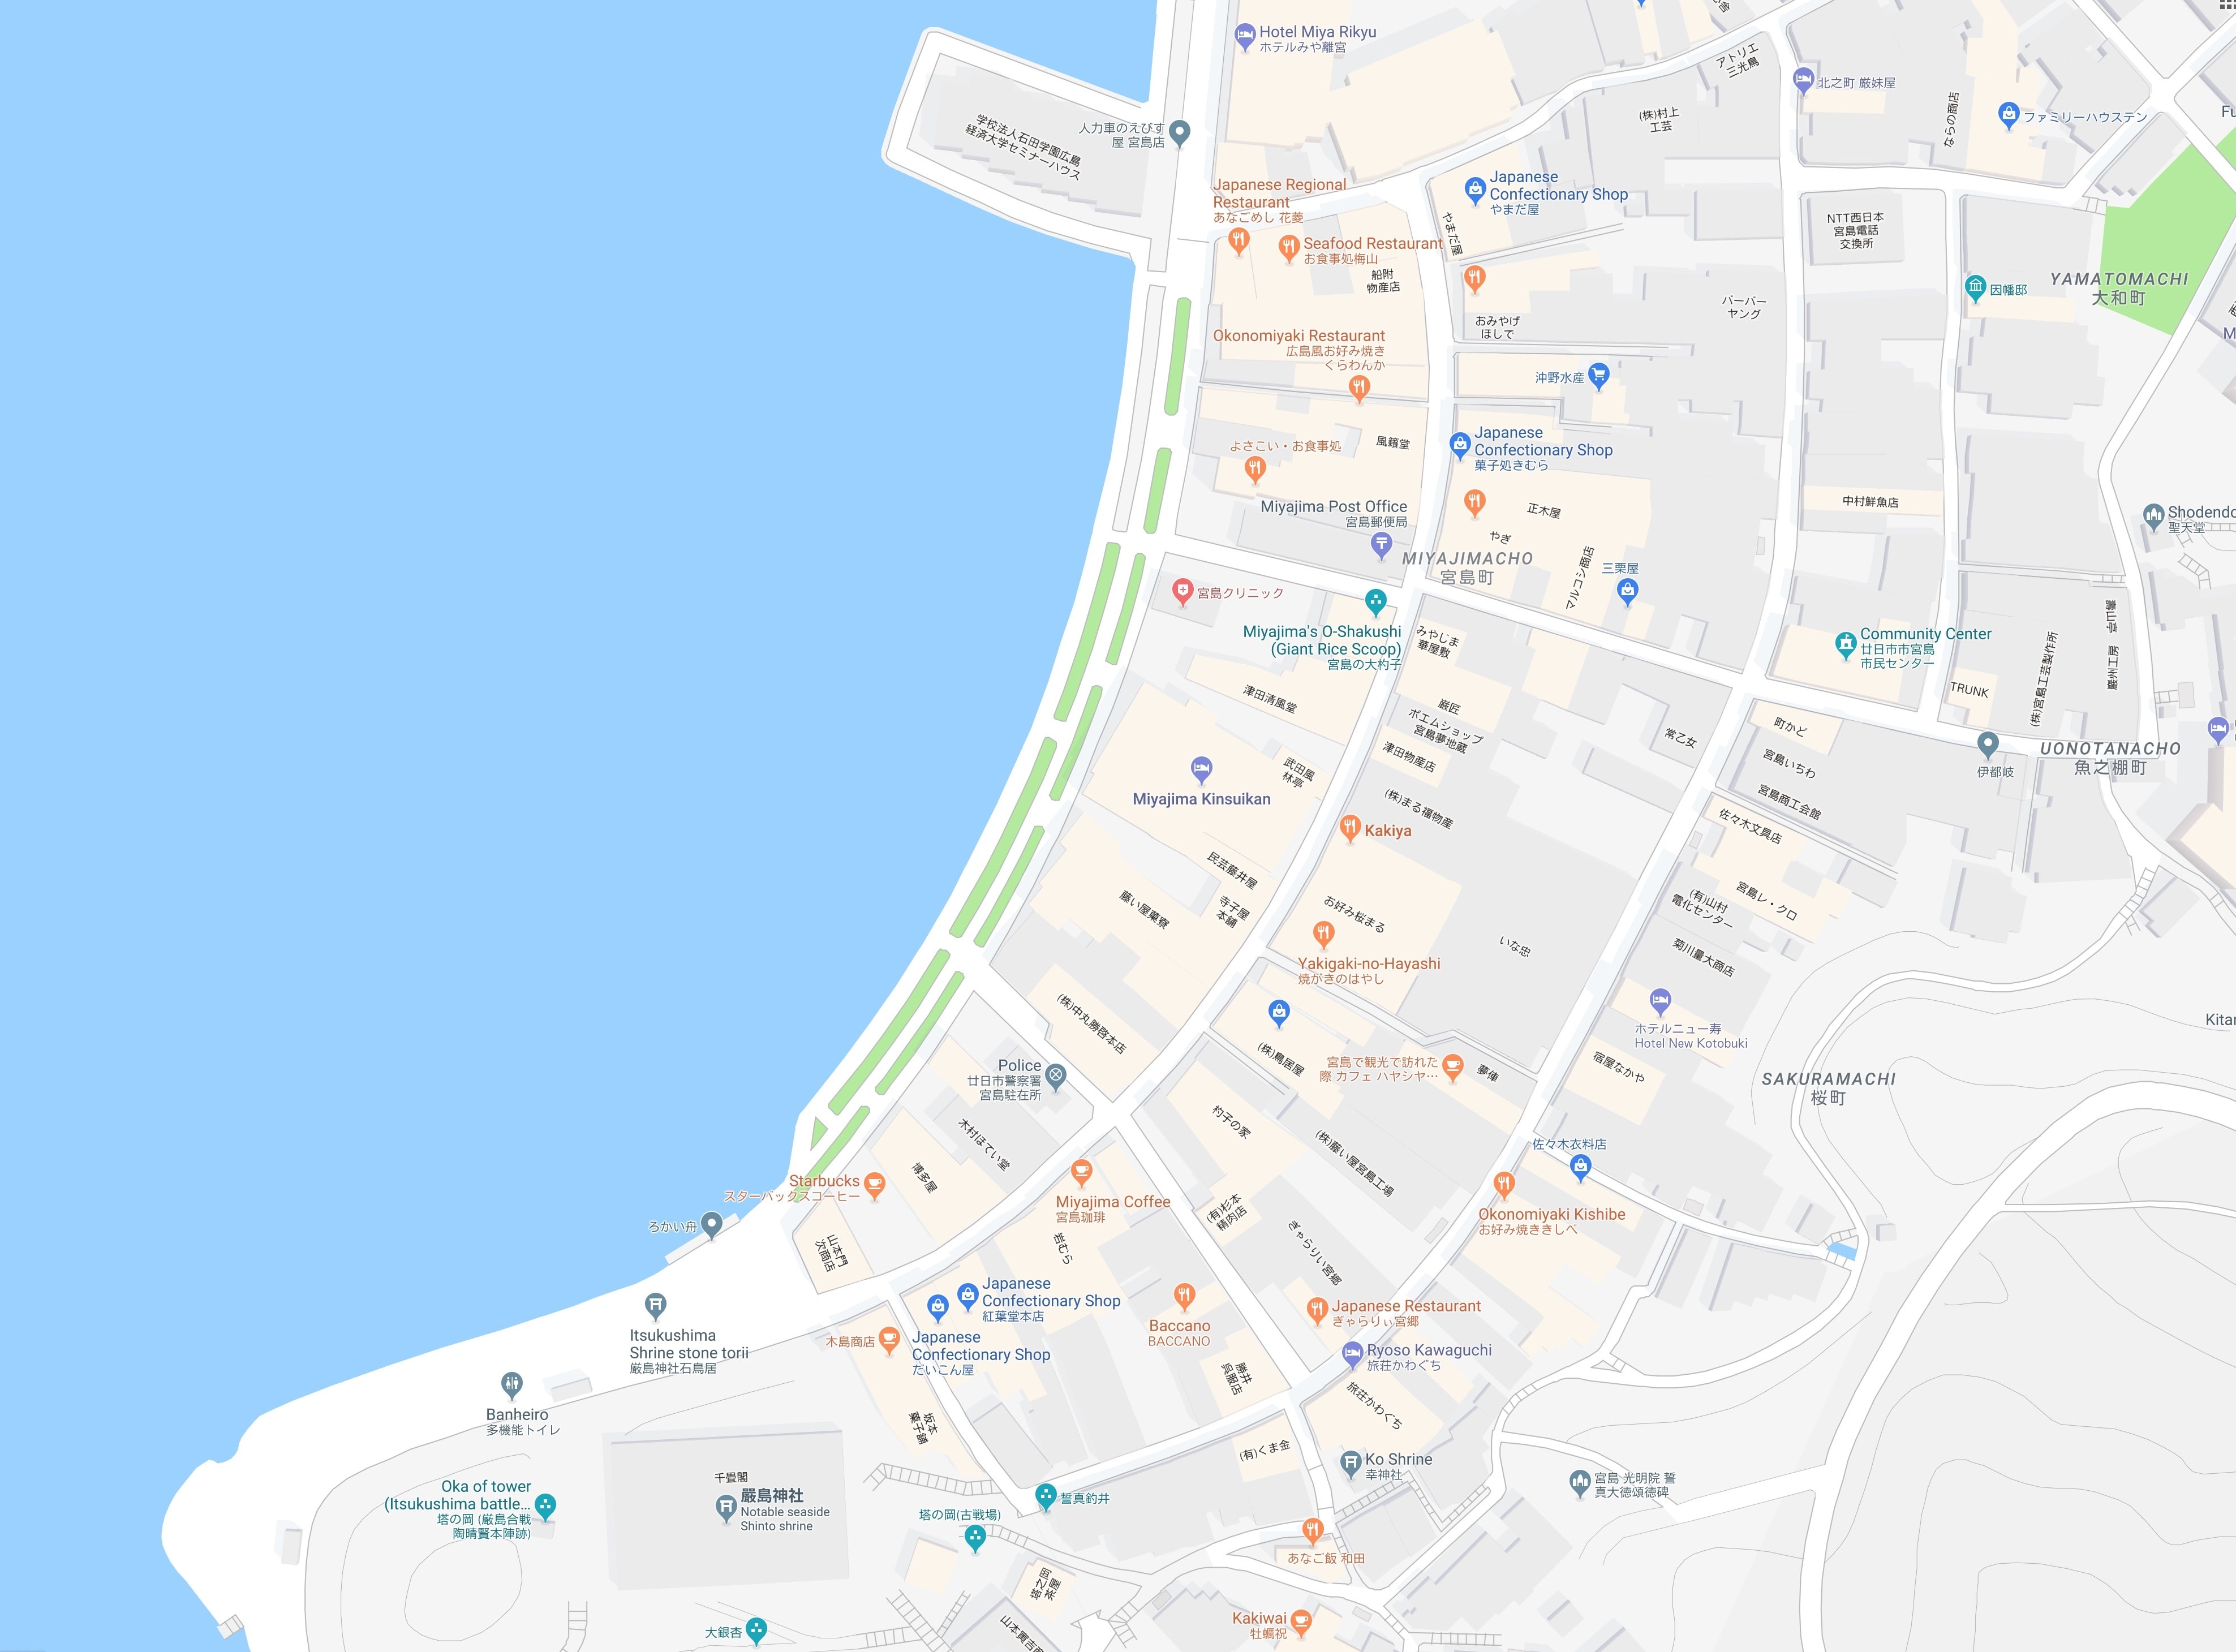
Click to enlarge map.
After visiting Itsukushima Shrine, climbing Mount Misen, and enjoying the views of Hiroshima bay, we headed over to walk around downtown Miyajima. The downtown area is quite small, about 4 or 5 blocks filled with restaurants, gift shops, and food stalls.


Besides oysters and see eels, Miyajima’s rice scoops (shamoji – 杓文字) are really well known throughout Japan. Supposedly the rice scoops is first invented here. They also have the world’s largest rice scoop on display.


Other sightseeing locations on the island includes other shrines, such as Tokokuni Shrine 5-story pagoda, Shinmesha, and Daiganji (not pictured).


As we need to get to Beppu (3.5 hrs away) later on in the day, we left around noon time for Hiroshima.


See you Miyajima! We had a fabulous time and we hope our guide was helpful if you decide to visit. When we got back to Hiroshima, it was one of our favorite past time, pick bento at the station! The most popular bento was sea eel over rice.

We hope you enjoyed the Hiroshima Japan Guide so far. For the next travel post, we’ll travel by ferry to Miyajima. Something dramatic happened while we were on our way to the island. Stay tuned and don’t forget to subscribe our FREE Just One Cookbook newsletter delivered to your inbox!
If you are are interested in our Travel Blogs, you can view them here.
The post Miyajima Travel Guide 宮島旅行ガイド appeared first on Just One Cookbook.
from Merah Hati Cintaku http://ift.tt/2EmOV8g
via MerahHatiCintaku.blogspot.com