
Incredible Ginger Cashew Chicken Stir Fry with Coconut Cauliflower Rice from the new Healthy Glow Co. HGG Reset! This protein-packed dish has bright colors, delicious flavors, and is perfect for meal-prep. It’s almost the weekend and I’m SO excited to be sharing one of my favorite recipes from the HGG Reset. I started our 4-week [...]
The post Ginger Cashew Chicken Stir Fry with Coconut Cauliflower Rice from HGG Reset appeared first on Ambitious Kitchen.

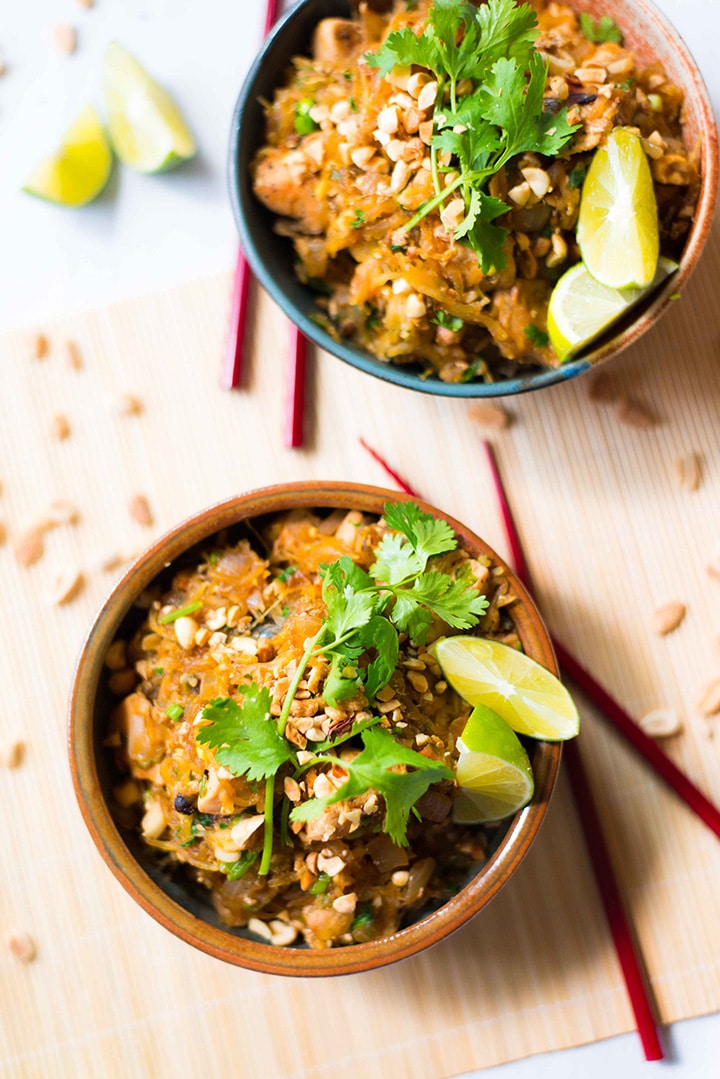
This spaghetti squash pad thai recipe is a low carb alternative to chicken pad thai and is so incredibly delicious! This recipe is clean eating, gluten-free, dairy-free, and paleo.

Pad thai is one of my absolute favorite Thai foods. The combination of flavors and textures and sauce and heat is just so amazing.
My only sadness with pad thai is that I don’t often get to enjoy it because it is pretty heavy on the carbs, considering it is made up of a lot of noodles.
So, instead of using regular rice noodles, I chose to use spaghetti squash noodles for this pad thai recipe. The spaghetti squash adds a fun alternative to the rice noodles and also reduces the carbs and calories, while increasing the nutrients, like protein and fiber.
Really, what this means is I get to enjoy pad thai more often, and you can, too!


If you’ve never tried it before, pad thai is delicious. It’s basically a stir fry that consists of rice noodles, stir-fried with eggs and another protein, like tofu, chicken, or shrimp. The strong flavors comes from the pad thai sauce, which commonly contains tamarind pulp, fish sauce, garlic, red chili pepper, and palm sugar and it’s usually served with lime wedges and topped with chopped peanuts. See? YUM.
One of my favorite things about pad thai is all the toppings you get with it – they add all sorts of flavors and textures. Common pad thai toppings include lime wedges, roasted peanuts, bean sprouts, cilantro, and so on. I use many of these in this spaghetti squash pad thai recipe.

Spaghetti squash noodles are a fabulous alternative to regular pad thai noodles because they are low in carbs, gluten-free, grain-free, and contain fiber and protein, along with other nutrients. Cooking the spaghetti squash couldn’t be easier. To see step by step directions on how to make spaghetti squash noodles, go to this post. There are a couple main ways to make spaghetti squash, which I’ve listed out below:
HOW TO BAKE SPAGHETTI SQUASH NOODLES IN THE OVEN Slice the spaghetti squash in half lengthwise (you could cut into rings if you’d like, but I find lengthways to be easier to remove the seeds and bake) Remove the seeds Drizzle each cut side with olive oil and season with sea salt and black pepper (this step is totally optional, but will add flavor to the baked spaghetti squash noodles) Place each half of the spaghetti squash face down on a rimmed baking sheet lined with parchment paper or aluminum foil Place in the oven and roast for about an hour The squash is done when the noodles easily pull away from the skin and you can easily pierce the skin with a fork Using a fork, scrape the insides of the squash to separate the strandsIt takes literally 5 minutes to prep the spaghetti squash to be cooked once the oven is preheated. So easy!
HOW TO COOK SPAGHETTI SQUASH IN THE MICROWAVE Slice the spaghetti squash in half lengthwise (you could cut into rings if you’d like, but I find lengthways to be easier to remove the seeds and bake) Remove the seeds Drizzle each cut side with olive oil and season with sea salt and black pepper (this step is totally optional, but will add flavor to the baked spaghetti squash noodles) Place one of the spaghetti squash halves face down in a small microwave-safe casserole dish or rimmed plate Pour 3-4 tbsp. water into the dish Microwave 8-10 minutes, or until the skin is tender when pierced with a fork Using a fork, scrape the insides of the squash to separate the strands into the spaghetti noodlesThe microwave method is quicker, but doesn’t provide as much flavor as the roasting – but works great when you’re in a rush!

Since having spaghetti squash noodles on hand is a great way to decrease the prep time for making this spaghetti squash pad thai, you can quickly and easily freeze your spaghetti squash noodles once they’ve been cooked to grab at a later time.
Believe it or not, it is very easy to freeze spaghetti squash noodles. Yay! While the texture wont be quite the same as if it were freshly baked (it will be slightly more soggy once defrosted), it will still work in a pinch. All you have to do is portion it out and freeze it without any sauce.
Freeze the cooked chicken and pad thai sauce separately. Then, when you’re ready to cook the pad thai, allow the frozen pad thai sauce and spaghetti squash noodles to thaw overnight in the fridge, then add everything together and heat through. Easy peasy.

Good news, paleo friends. This pad thai recipe is paleo. The major culprit for why pad thai might not be paleo would be the noodles and the soy sauce. So, since we are using spaghetti squash noodles instead of wheat noodles, it makes it easy. While rice noodles aren’t technically not paleo, they’re also not Not paleo, meaning they cause some confusion for people. Also, this recipe doesn’t call for soy sauce, which makes it easy since soy isn’t allowed on a paleo diet.
Is Pad Thai Gluten-Free?While you can easily make your own homemade pad thai gluten-free, you’ll need to be careful when ordering out at restaurants. You’ll need to know whether the noodles are rice-based, like vermicelli or pad thai noodles, or wheat-based, like egg noodles. Also, you’ll need to replace regular soy sauce with a gluten-free alternative, such as coconut aminos. Coconut aminos works just like soy sauce, which makes it very easy to make your own gluten-free spaghetti squash pad thai recipe at home.
Since this spaghetti squash pad thai recipe uses spaghetti squash noodles instead of wheat noodles and doesn’t call for any soy sauce, that makes it a gluten-free pad thai recipe.

This spaghetti squash pad thai recipe is a low carb version of chicken pad thai and is so incredibly delicious! This Pad Thai recipe uses spaghetti squash noodles instead of rice noodles.
Add the coconut sugar, fish sauce, and red pepper flakes. Set aside.
Heat 1 tbsp. olive oil in a large skillet over medium-high heat. Add the chicken and cook until well-browned, about 5-6 minutes. Remove the chicken from the pan and place on a plate for later, reserving the drippings in the pan.
Add onion to the same pan and stir to combine. Cook 4-5 minutes, or until onion becomes tender. Add the garlic and cook an additional minute. Push ingredients to one side of the pan and add 1 more tbsp. olive oil in the cleared area. Add egg and scramble until cooked through. Combine cooked egg with onion mixture.Return the chicken to the pan. Add the cooked spaghetti squash noodles and sauce. Toss together to incorporate sauce with noodles. Cook 4-5 minutes, until noodles get slightly golden-brown.
Remove from heat. Add green onions, cilantro, and the chopped peanuts. Toss once more.
Serve with a couple wedges of lime and sprinkle some crushed peanuts over the top. Squeeze lime over Pad Thai prior to eating, if preferred.This post contains affiliate links for products I use regularly and highly recommend.
The post Spaghetti Squash Pad Thai appeared first on A Sweet Pea Chef.


Fact: the human brain remembers negative events better than positive ones. (Heres’ one source, there are many.) Yes, it’s true. Those snide remarks, criticisms, fears, and worries stick out like sore thumbs. Have you ever had something fabulous happen, then to be dwarfed by the smallest “negative” event your mind can’t help from focusing on?
Confession: my perception of what parenting would be like was skewed to the negative. Hearing what parents all around me had to say about it, I assumed my life would be full of dirty diapers, sleep deprivation, frustration, helplessness, loneliness, and boredom. But what I’ve realized is that I’ve heard positive things from parents too, I just didn’t remember them as well.
It’s the best, most fun thing you’ll ever do. (Check!)
Your soul is changed; you cherish the smaller things more. (Check!)
Looking at your kiddo makes your heart melt in a way you’ve never felt before. (Check!)
And it goes on. I do think Alex and I got lucky: Larson is an extraordinarily awesome kid who is fun-loving, curious, hilarious, and sweet, and pretty much the most fun person to be around in the universe (I know, I’m biased!). But I think the fact that I’m surprised that parenting is the most positive thing I’ve ever done is because my brain hears and remembers negative loud and clear.
How does that relate to this vegan pot pie? Well, you may remember us talking about all the kitchen failures we’ve had in the past. Being adventurous in the kitchen calls for taking risks, and with risks comes failures. It can be easy to start to fear failure when you’re taking culinary risks. Last week, Alex said he’d make dinner for me. That evening, he made up this vegan pot pie from scratch based on just an idea in his head. Knowing what I know about risk and failure, I assumed it would be a flop–and I wanted to keep my expectations low in case we ended up eating peanut butter sandwiches. Miraculously, this vegan pot pie was one of the best things I’d ever tasted. The earthy potatoes and onions are slathered in a savory, creamy sauce, along with fried shallots and white beans. And on top, a flaky sage crust that you’d never believe is vegan (his secret: coconut oil).
This time, I decided to bask in the glow of the vegan pot pie triumph. We made it again, and it was spot on. Larson was in love with the pot pie, eating more than we’d ever seen him eat and slamming the table with his hands in glee. And though I know my brain is wired to remember the negative best, I intentionally impressed this positive memory into my brain: Cozy, delicious vegan pot pie. Sparkling snow on the ground. Sweet 11 month old Larson covered in vegetable goo. This is what I want to remember.
Looking for more healthy dinner recipes?Looking for some healthy dinner recipes? Here are a few more of our favorite healthy dinner recipes, which happen to be vegan recipes:
Moroccan Spiced Cauliflower SoupSpiced Chickpea Tacos with Avocado CreamSimple Chickpea Curry with Tart CherriesCreamy Vegan Pasta MarinaraDid you make this recipe?If you make this vegan pot pie with sage crust, we’d love to hear how it turned out. Leave a comment below or share a picture on Instagram and mention @acouplecooks.
This recipe is…Vegetarian, vegan, plant-based, dairy-free, and sugar-free.
A Couple Cooks - Recipes for Healthy & Whole Living
from Merah Hati Cintaku http://merahhaticintaku.blogspot.com/2018/01/ginger-cashew-chicken-stir-fry-with.html
via MerahHatiCintaku.blogspot.com